
If you are a Windows user for a long time, you have a faced few issues till now. These problems include virus issues, data loss and sometimes having to reinstall the whole operating system as well. In order to tackle this, Microsoft has come up with an in-built tool that will let you restore your PC to revert the changes and go back to the previous functional state system. This will help you to erase all the problems that occurred due to the different system issues. Here is the complete guide to use system restore on windows 10.
In this article, we at Laptoprepair.world are going to explain in detail about what System restore is, how does it work and how to use it to fix your system issues.
System Restore Explained:
System Restore is a tool provided by Microsoft that helps you to revert the changes that happened on your computer in order to solve the issues your computer is facing. When your computer is facing system malfunctions, you can use this feature is fix it.
What System Restore does is, it saves the point of the last functioning state of your system where it did not have any issues and will revert back to it whenever you face any issues on your computer. In simple words, what System Restore does is saving the snapshot of different system components such as hardware drivers, System registry and System files. It saves them at regular points of time when you do any major changes to your computer. System Restore does the job when you do the Windows update, any driver installation or hardware driver update.
You can even do the manual restore points of your computer if you are doing any major changes to your system. Doing this way will help you to revert back to the restore point if anything messes up on your system.
Things you need to know about System Restore on windows10:
Below are few things you need to know about the System Restore.
- Do not get confused System Restore with the backup feature. What System Restore does is saving the last point of the functioning state of the system. It does not save any data stored on your computer that the backup feature does. These are two completely different features.
- If you delete any app after the restore point in your computer is created, then there are minor chances that the app will work when you revert to the restore point. This happens because System Restore can only save a few files and programs and does not save installer files which is the backbone of application functioning.
- After a certain period of time, all restore points will be deleted. This happens because System Restore does not allow to create a specific permanent restore point. If you want, you can alter the time of restore points deletion. However, we do not recommend you to do it as it will cause few issues with the System restore functioning.
- You don’t need to worry about other applications impacting System restore functioning. This is because the directory in System restore does not allow any other apps to make changes to it.
- The only problem with System Restore is, if any virus is present at the creation of any restore point and it is restored on your computer, then the virus will also make its way to your system. What you need to do at this point is to delete that virus-infected restore point and revert back to an older restore point.
Guide To Use Restore on Windows 10 Problems
There are few steps involved while using the System Restore. First, you need to enable System Restore and then you can either chose to set up restore points automatically or you can manually create a restore point. In this article, we are going to explain in detail about how to enable System restore and creating the manual system restore on Windows 10.
Enable System Restore:
As System Restore is an in-built feature, it also comes with pre-enabled on Windows 10 systems. Even if it’s not pre-enabled, you don’t need to worry. Follow the below steps to know how to do this.
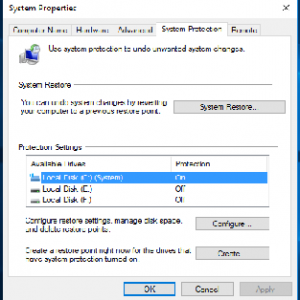
- Click on the Start icon located at the bottom left side of your screen and in the search bar, enter ‘Restore point’
- The top result will be ‘Create a restore point’. Click on it to open.
- Tap on the System protection tab and under the Protection settings, you need to select your Computer local drive C.
- Click on the Configure button.
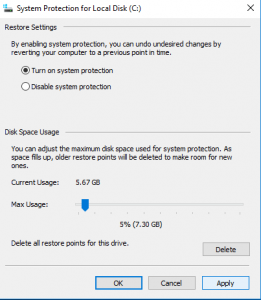
- On the new window, under the Restore settings, you need to select the ‘Turn on System protection’ option.
- Under the disk space usage section, you need to choose the maximum disk space allotted to the system protection. Use the slider to do this.
- Click on the Apply button to apply the changes and then click on OK to close the window.
Now that the System Restore on windows 10 is enabled, your computer will automatically create the restore points every week. Please note that since we have enabled System restore on Drive C in this article, it will only create the restore points of the specific drive only. Usually, this is enough to avoid any major issues but if you want all drives to have restore points, then you need to follow the above steps to do it.
Create a restore point manually:
Even when the System Restore automatically creates the restore point every week, you can also create a restore point manually as well. This comes in handy when you want to create a restore point before performing any major actions on your computer. If you are about to update an operating system or even installing an application or any hard drive which might cause issues to your computer, you can then use these manually created Restore points to revert back the changes.
Follow the below steps to know how to create a restore point manually on Windows 10:
- Click on the Start icon located at the bottom left side of your screen and in the search bar, enter ‘Restore point’
- The top result will be ‘Create a restore point’. Click on to open.
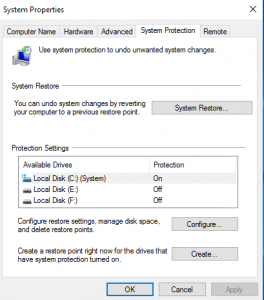
- Click on the System Protection tab.
- Under the Protection settings, click on the create button.
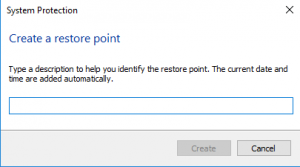
- Name the restore point that is easy to remember so that you can select it at the time of system restore.
- Click on the Create button.
- Now the manual restore point creation will start. It will not take more than 1 minute to complete this task. Once the task is done, click on the close button.
Restore your system to a restore point:
If your system encounters any problems, you can just restore your system to a previously saved restore point. Follow the below steps to know how to do it.
- Click on the Start icon located at the bottom left side of your screen and in the search bar, enter ‘Restore point’
- The top result will be ‘Create a restore point’. Click on it to open.
- Click on the System Protection tab and then click on the System Restore button.
- On the System Restore window, click on the Next button.
- On this window, you will be able to see all the restore points saved on your computer. Click on the restore point you want to restore your computer and then click on the Next button.
- If you want to know the applications that will be affected during this process, click on the ‘Scan for affected programs button.
- here you will be able to see two sections. They are ‘Programs and drivers that will be deleted’ and ‘Programs and drivers that might be restored’
- Click on the Close button to return back to the Restore point selection window and then click on the Restore point you want to restore to your computer.
- Click on the Next button and then click on Finish button to confirm it.
- A new dialog box will be opened. Click on the Yes button.
- Now windows will start the restoration process on your computer. Note that the time taken to complete this depends on the amount of data you are restoring on your computer.
Conclusion:
Hopefully, we have covered everything about the System restore on windows10, how to create it and how to restore it in this article. If you have any issues regarding the above article, then please let us know your query in the comments below. We will get back to you as soon as possible with the best solution.