
If you are someone who works on a computer for a living, you would have definitely faced the mundane task of organizing all the folders and files so that they can be found easier later. Few people would have automated this task to avoid the regular boring work. There are many in-built tools and even third-party tools for this. In case, if you are finding it hard to organize the folders, Smart folders is the one that will help you a lot. In this article, we are going to explain in detail about Smart folders on Mac, it’s functioning and how to use them to your advantage.
One of the most underappreciated features of iOS is Smart folders. This is an in-built feature on MacBook. This feature helps you to organize all the folders and files that in turn saves you time and work. If you are someone who does not know anything about Smart folders, do not worry. We will explain you in detail on how to create and delete smart folders on Mac.
Smart Folders on Mac
What are Smart folders:
Smart folders are just like the normal folders on your Mac. The difference between Smart folders and normal folders is that smart folders are more like saved searches that are based on the criteria that helps you to organize similar kind of files in one folder. When you create a specific smart folder, you can also choose the properties of the folder that helps it during the files allocation.
Why should you use Smart folders:
As already stated, Smart folders allow you to organize different files in one place so that they are easily accessible. With the help of this tool, you can get your work done fast which in turn boosts your productivity rate.
If you want an example of how using the Smart folder boost your productivity, take a situation where you capture a lot of screenshots in your daily life on your Mac. These screenshots usually by default comes in PNG format. Consider you want them in the JPEG format and you need to convert all the PNG files to JPEG format. In order to do this, you need all the screenshots in one place to start the conversion process. Now in this situation, if you use the Smart folder and set the format such that all the files that end in PNG format are organized in one folder, it will get the task done. This in return saves you from the cluster of moving the files to different folders which will save you both time and improve your work efficiency.
Also Check: How to Clear Up Other storage on MAC: Strategies
How to create a Smart folder:
We have already explained what are smart folders and the advantages of using them. Now we are going to explain how to create them. Follow the below steps to know how to create a Smart folder.
- Open Finder on your Mac.
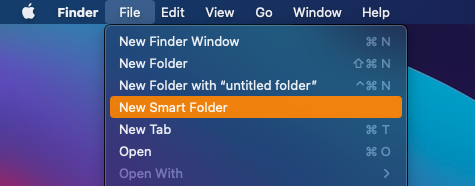
- Click on the File section located at the top left corner of the screen.
- In the drop-down menu, click on the ‘New smart folder’ option.
- Next to the Search option, click on ‘This Mac’. In order to create smart folders in any location, go to that folder and then click on Select File and then Smart folder there.
- On the top right side of your screen, you will be able to see the search bar. In the search bar, enter your desired search term.
- From the suggestion that comes under the search bar, you can either select the ‘Name matches’ or any other certain criteria to use for the Smart folder use case.
- In case if you want to select different criteria, click on the + sign located below the search bar. Now you chose different properties for your search criteria.
- Once you are done with the search criteria for the query, click on the Save button and add a name to the Smart folder. Chose the location for it as well.
- That’s it. Your smart folder is created.
How to edit or delete Smart folder:
If you want to edit the changes to an already existing Smart folder, follow the below steps to know how to do it.
- Open the location of the Smart folder you created.
- Right-click on the folder and click on the ‘Show search criteria’ option.
- Now edit the search criteria as you wish and once you are done with it and click on the Save option.
You can also delete the smart folder you no longer use in a simple way. Open the location of the smart folder where you created it and then right-click on it. In the options, click on the ‘move to bin’. That’s it. The smart folders on mac will be deleted now.
Hope we have covered everything about smart folders, it’s advantages, how to create and delete them. If you have any issues with the above article, please let us know in the comments below. We will get back to you as soon as possible with the best solution.