Several users are reporting issues with their Windows 10 update. This is one of the most common problems Windows 10 users are facing in recent times. These issues are usually addressed with an identification code so that they can be fixed easily without any confusion. The most common error Windows users are facing is 0x8008008. What happens during the Windows update is you will be prompted with this particular error code when any of the windows files are partially downloaded and not properly installed. In order to fix this error, there are a few methods that you can implement. In this article, we are going to explain how to fix Windows 10 Update error.
How to fix Windows 10 Update error:

Disable your Anti-virus:
Sometimes, the Anti-virus you installed on your computer may be causing this particular error. In order to fix this, you need to disable some of your anti-virus features and then check if you are able to update the Windows.
If this doesn’t work, then you have to disable the anti-virus on your computer and then check if you are able to update the windows. Now if the error is still preventing the update, then there is no other option than uninstalling the anti-virus on your computer. You don’t have to worry about any virus attacking your computer because Windows have the default Windows Defender installed on your computer to defend against any virus.
If the update issue is resolved after you uninstalled the anti-virus on your computer, then please don’t install it again. Instead, you can opt for another anti-virus if you want.
Do SFC and DISM scans:
There might be an issue with the installation procedure if the error 0x80080008 is repetitive. If your windows installation is corrupted, then that will lead to this error.
This problem can be fixed by performing SFC and DISM scans. Follow the below steps to know how to do an SFC scan:
- Right-click on your desktop and open the Start menu.
- In the drop-down menu, click on the Command prompt(Admin) option.
- Once the command prompt window is open, enter sfc/scannow in the command line and click on the enter button.
- Now your computer will search for the corrupt files and fix them.
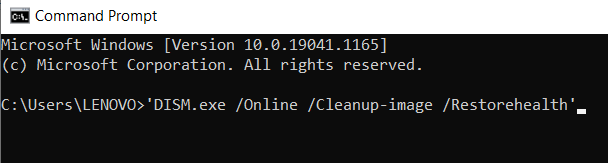
This method works only in a situation where corrupted files are the problem. However, if you are unable to fix the update error with the SFC scan, you can try with DISM scan. Follow the below steps to know how to do it.
- Click on the Windows Start icon located at the bottom left corner of the screen.
- In the search bar, enter ‘Command prompt’ and then click on the top result to open it.
- Enter the below command in the Command prompt window ‘DISM.exe /Online /Cleanup-image /Restorehealth’
- If the DISM is unable to obtain the files online, you can try the installation using any external USB or DVD. Connect it to your computer and then enter the below command. DISM.exe /Online /Cleanup-Image /RestoreHealth /Source:C:RepairSourceWindows /LimitAccess
- Please note that you need to replace “C:RepairSourceWindows” with the path of the USB or DVD connected to your computer.
After the scan is completed, try to update your Windows. If the problem is not fixed with the DISM scan, you can try now with the SFC scan again. It works sometimes but if it doesn’t fix the problem, scroll down below for more solutions.
Restart Windows update components to fix Windows 10 update error:
Sometimes Windows update components might be the reason you are facing the error 0x80080008. In order to fix this problem, you need to restart Windows update components.
This can be done in both ways, manually and using the command prompt. Since doing it manually is a long tedious process, we will be using the Command prompt here.
Follow the below steps to know how to reset Windows Update components using Command prompt.
- Click on the Windows Start icon located at the bottom left corner of the screen.
- In the search bar, enter ‘Command prompt’ and then click on the top result to open it.
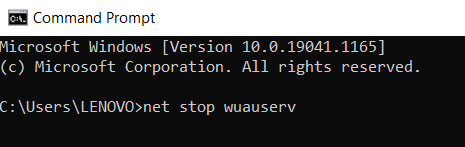
- Now run the below command in the Command prompt window.
- net stop wuauserv
- net stop cryptSvc
- stop bits (net stop bits)
- net stop msiserver
- ren C:WindowsSoftwareDistribution SoftwareDistribution.old
- ren C:WindowsSystem32catroot2 Catroot2.old
- net start wuauserv
- net start cryptSvc
- start bits (net start bits)
- net start msiserver
Running these commands should be able to solve the issue and then you can install the updates without any errors.
Manually download the Update:
If you are encountering the update error 0x80080008 again and again, you can fix the error by simply downloading and installing the update manually.
Follow the below steps to know how to manually download the update.
- To do this, you need to know the KB number of the update you are trying to install. You can find this number from the Windows update section or you can simply visit the Windows update history section.
- After you know the KB number of the update, you need to open the Microsoft Update catalog website. In the search field, you need to enter the KB number of the update you are trying to download.
- Here you will be able to see a list of results. Select an update that matches with your system specifications and then click on the download option.
- Once the update download is finished, you need to run the setup file to install it on your computer.
After the update is installed on your computer, your system will have the latest update version installed fixing the error you are encountering till now.
Restart BITS service:
Background Intelligent Transfer Service is one of the important components for the Windows update. Sometimes, due to multiple reasons it might crash and cause update issues. In this case, you need to restart the BITS service and then check if you are able to complete the update.
Follow the below steps to know how to restart BITS service:
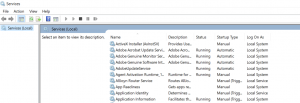
- Open the Run app by pressing Windows + R keys.
- In the search section, enter services.msc and then click on enter.
- Here you will be able to see all the services. Look out for the Background Intelligent Transfer Service and then double click on it to open it’s properties.
- If it is showing Stopped in the service status section, click on the Start button.
- Click on the Recovery tab located at the top bar of the window and then make sure that the First failure and Second failure sections are set to the ‘Restart the service’ option.
- Click on the Ok button and now try to do the Windows 10 update.
Few users fixed the error update with this solution.
Also Check: System Restore on Windows 10 – Complete Guide
Boot in a safe boot mode to fix Windows 10 update error:
In few cases, the application running in the background of your computer will cause issues to the Windows update. In order to fix this, you need to boot in a safe boot mode.
Follow the below steps to know how to do this:
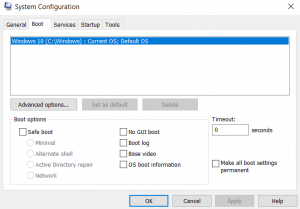
- Open the Run app by pressing Windows + R keys.
- In the search box, enter msconfig and then click on the Ok button.
- Click on the services tab located at the top bar of the window. If it is unchecked, then check the ‘Hide all Microsoft services’ box and then click on the Disable all button.
- Besides the Service menu, click on the Startup tab and then click on the Open task manager option.
- Here you will be able to see all the startup programs. Now disable all of them individually.
- After you are done with it, click on the restart your computer and then try to update your Windows computer.
Perform an in-place upgrade:
If trying all the above solutions did not fix the issue, then one might be the one to fix the Windows update issue. Several users reported that doing this fixed the update errors. What happens when you perform an in-place upgrade is that it will force your computer to install the latest version of Windows while not messing up with your files and apps.
Follow the below steps to know how to perform an in-place upgrade:
- You need to download the Media creation tool and install it on your computer.
- After you are done with the installation, open it and then select the ‘Upgrade this PC now’. Click on the Next button.
- The tool will start preparing the necessary files.
- Now you need to select ‘Download and install updates’ and click on the Next button.
- The updates download procedure will begin now.
- Now you need to follow the instructions until you reach the ‘ready to install’ window. Now click on the ‘Change what you keep’ option.
- Here you need to select the ‘Keep personal files and app’ and then click on the Next button.
- Now follow the instructions that appear on the screen till the installation is completed.
- After the installation is completed, your computer will be updated to the latest Windows version without any errors.
Hope we have covered everything about how to fix the Windows 10 update errors. If you have any issues with the above article, please let us know your queries in the comment below. We will get back to you with the best solution as soon as possible.